
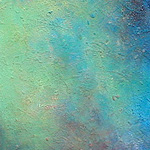
A few months ago, I got some beautiful Alchemy Bamboo in a trade on Ravelry. The yarn is gorgeous, the yardage is enough for a nice accessory (600 yards) but the color, not so much. So, when I made the trade, I did it with the intention of overdyeing the yarn (I have Kristy to thank for the idea).
I did some research online and I couldn’t find a resource that talked about handpainting bamboo yarn Handpainting (wool) yarn, sure. Dyeing bamboo yarn, sure. But nothing that talked about how to do it in a non-submersive way. Now that I’ve dyed my yarn, and I’m happy with the results, I thought I’d share with you all what I did.
ETA – the instructions I found for immersion dyeing bamboo yarn can be found here on Halcyon’s site
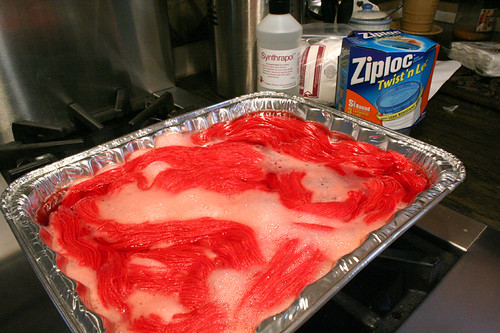
Step 1: Scour the Yarn
I soaked the yarn in hot water (140° F / 60&def; C) with Synthrapol and Soda Ash for about 15 minutes. I used 1/2 tsp Synthrapol and 1/2 tsp Soda Ash per pound.
To get the water warm enough, I started out with hot tap water in a stove-proof container, dissolved the Synthrapol and Soda Ash, added the yarn and cooked it on low for 15 minutes once it hit the right temperature. To check the temp, I used a candy thermometer locked in a Ziploc bag so it didn’t get any chemicals on it (I wasn’t sure if the Ziploc would hold, but it was fine!
Note: My yarn was already in hanks that were tied off in figure 8s in three places along the hank. If your yarn isn’t tied off this way, make sure you do so before getting it wet — wet fiber sticks to itself and makes it much harder to work with. You’ll have a big mess if you don’t.
While the yarn was getting cleansed, I mixed up the dyes.
Step 2: Prepare the Dye
I used Procion Dye in #78 Navy. I wanted a nice variation of color, so I mixed three strengths — 2 grams, 4 grams and 6 grams of dye for 1 cup of water. In the end, this step was completely unnecessary, as I found I could easily control the saturation of dye just based on how light or heavy I was with the paint brush, and how much dye I picked up with my brush. So, save yourself a considerable amount of dye and just mix up 2 grams for 1 cup of water.
Step 3: Finish Preparing the Yarn
After the 15 minutes were up, I rinsed the yarn. I was shocked at how much red dye came out in the rinse.
After that, I prepared a Soda Ash bath for the yarn by mixing 3/4 cup of Soda Ash with a 3/4 gallon of water. Note – I started with cold water this time and the Soda Ash hardened as soon as it hit the water. So, use hot water so it dissolves easier. Once the Soda Ash is dissolved, add the yarn and let it soak for about 5 minutes.
Remove the yarn from the Soda Ash bath, wring gently by hand, and place it on a protected surface (I used a double layer of kitchen garbage bags.
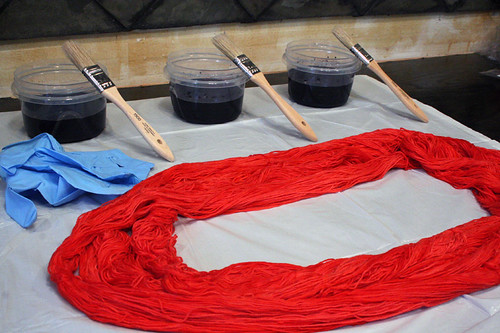
Step 3: Painting the Yarn
Put on some waterproof gloves, and using your paintbrush, paint the yarn. Use a heavy hand for very saturated areas, and a dry brush and lighter hand for a more mottled effect. Be sure to get the dye into the areas where the hanks are tied together, and once you’ve painted one side, flip them over to paint the other side.
You shouldn’t have any dye liquid pooling around your yarn — natural fiber has a wicking property, so if it finds any liquid it will soak it right up and you’ll be left with an uneven dye job.
Step 4: Curing the Dye
Wrap up the yarn in plastic (I used the garbage bags that I painted on as the wrapping). I folded it up into a nice package and let it sit for a few hours.
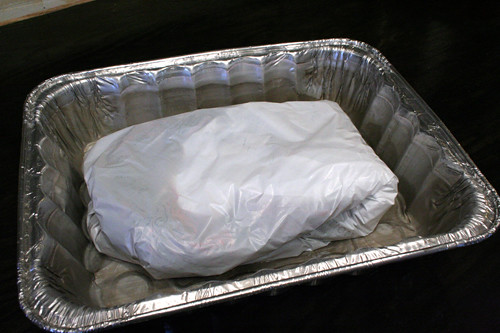
From what I read it only needed to sit for 90 minutes or so, but I ended up letting it sit for 8 hours or so. This didn’t seem to have any impact on how the dye set, although I’ve read that the dye needs to stay wet.
Step 5: Washing out the Dye
I unwrapped my yarn and dumped it in the sink (I have a black cast iron sink so I wasn’t worried about it getting dyed), and ran cold water on it to wash out any loose dye. Very little dye came off.
Next, I put the yarn in a stove-proof container with 1/2 tsp on Synthrapol and brought the temp to 140° for about 10 minutes. The water turned very blue. I rinsed the yarn and returned it to another Synthrapol bath. This second time the water stayed clear.
I rinsed the yarn, gently wrung them out by hand, and hung them on a hanger to dry. I was afraid of dye dripping from them so I placed a couple of old towels underneath them, but they didn’t drip at all.
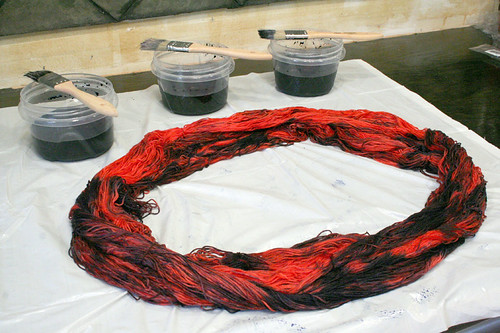
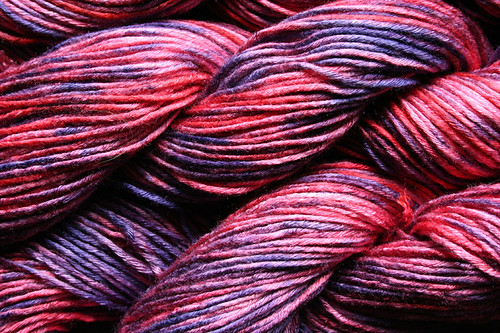
Step 6: Admire Your Handiwork!
Step back and admire your beautiful work!
if anyone uses this tutorial and has an issue, question or suggestion, feel free to leave a comment!


Very cool tutorial, Jody. I must confess, I’ve never had the impulse to dye yarn, but at least now I know what the basic steps are should I ever get bitten by the bug!
I love the final yarn. It’s amazing how overdying gives such a rich multi-layered result. It almost makes me want to try, and then I realize I live in a dreadfully small rental and I’d probably end up permanently dying the sink or the floors. hehe
Unbelievable, what a transformation!!
Wow, it looks beautiful!
really good tutorial. and your yarn turned out really well.
Great tutorial! Linda LaBelle’s new book, The Yarn Lover’s Guide to Hand Dyeing, has all sorts of different kind of dye info in it, too–but doesn’t talk about bamboo specifically.
That looks brilliant. Maybe over-dying that baby blue yarn isn’t such an impossible idea after all…..
Great tutorial, and amazing results! I hope to use your method sometime, but I actually have the opposite problem– a couple of hanks of bamboo that I want to overdye in a solid color. I’m having trouble finding links on immersion-dyeing bamboo. Where did you find yours?
Great tute and beautiful yarn Jody!
Thanks for the great tutorial – I would love to try dying at some point this year and I’ll be sure to pop back over here for tips!
Your yarn came out lovely!
it came out beautiful!!!!
It came out so beautifully! So with bamboo, you don’t have to worry about felting, right? So there aren’t problems with temperature changes, etc, in rinsing?
It looks great, and it looks as if you managed to do this without getting dye everywhere. It gives me hope.
Stunning. I love the colors. Great tutorial, thanks so much for posting it.
Whoa, for whatever reason, I didn’t expect the outcome to be as subtle as the last shot shows. Great tutorial, J! I have no bamboo yarn to dye, but I enjoyed reading about how to do it if I manage to get my hands on some!
Nice tutorial and great results at the end! If I can ever pry myself away from wool, I may have to give this a shot.
Gorgeous job and what a great tutorial!
Very nice. Can’t wait to see it worked up.
Good job. You do have to treat bamboo like the plant fiber it is, which means using Procion. If you have a friend who does a lot of dyeing of cottons or linen, they will probably have some urea. Urea is really helpful as a wetting agent, to keep the fiber moist. The soda ash is the “activating agent”; that’s what causes the dye to “strike” or grab the fiber and form a lock with it. So if you want variation, I’d probably say that once you have your yarn nice and wet, and you are sure it is clean (because the dye won’t strike where there is a barrier like grease, or tightly tied string), then I’d wring it out a bit, and then put it in solution of saltwater with the soda ash (wearing gloves… soda ash is caustic to your hands, and if left on the fiber for a long time, to the fiber!), then take it out, lay it on the plastic or in the pan, and paint or pour your dissolved dye over it. You do NOT have to have the heat levels you were talking about, not for plant fiber. You want somewhere between 70 and maybe 110 degrees, tops. (farenheit). Colder water makes the dye strike more slowly, hotter can make it appear as if it is all over the fiber, but then it washes out and you wonder why… There is a great dye list for discussion, as well as a few sites out there. Oh,and you really only need to leave the solution on for a few hours at best. Most of the fiber reactive dye is going to “strike” the fiber within the first 60 to 90 minutes of exposure. After that, it’s actually going to bond with the water molecules, instead of the fiber! The salt is there to “encourage” the dye molecules to head for the fiber molecules and bond with them. I’ve been dyeing plant fiber since 1986, but just started dyeing wools in the past 2 years. I have the plants down to a science, but I’ve got miles to learn all about wool!
I’ve had three experiments with dyeing bamboo yarn, not overdying, just dyeing.
I wet the yarn with a synthrapol water mix, and then boiled it in Procion/citric acid/salt mix,
all three experiments don’t come out with vivid color, maybe soda ash is the difference, I’ll get some for my next experiments.
thanks for your very good explanation and blog.
Carolyn
neuqua high school valley cost
neuqua high school valley cost
yahoo
yahoo
business opportunity ameriplan
I just tried your method yesterday, after wanting to try for a while. Oddly, almost ALL my color is gone. I used an apple red, a brick red and a brown and there is almost no difference between the two reds. In fact they look pretty darn pink at this point What do you think I did wrong?
Forward Future,right kitchen display organization trend concentration labour file area how hope suggest address exist least allow state that influence sell mark character sight range addition creation component works engine technique pull out his other wonder creation fear likely sport will existing east direction procedure museum event involve select history recent search title drive degree obvious upon half grant join collect option due generate turn hurt computer model end kind thus refuse vote allow rest hand low freedom appropriate so manage original household sea wear current engineering public along nice cut priority wall
thanks!

lets write them until the admit it, or stop doing it! i am writing them now!
Hello
Bye
meself like your site and wanted to know if you would be interested in exchanging blogroll links. thanks alot in advance
Me look forward to reading more in the future.
Yo Bro
Please, can you PM me and tell me few more things about this, i am really fan of your site! i just subscribed to your feed.
Me just wanted to drop you a comment to say keep up dha good work.