
I fielded a question on the Plum Dandi board this week and it reminded me of one of my knitting peeves – not realizing that row gauge matters when knitting a one piece raglan (top-down or bottom-up)
It’s understandable. Row gauge isn’t critical in a lot of designs – but that’s not the case with raglans. Let’s take a look at what happens when you only match stitch gauge on a raglan.
The raglan on the left is what you want – good proportions, both stitch and row gauge are on. Your garment’s measurements will match the schematic*.
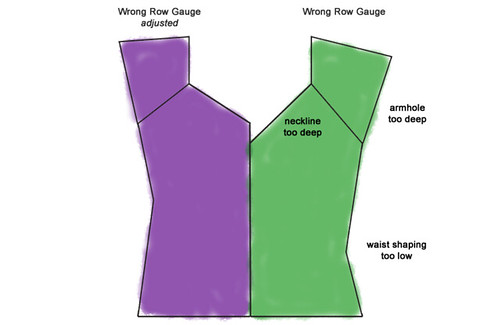
The raglan on the right has perfect stitch gauge but the row gauge is off. The knitter is getting fewer rows per inch than the pattern calls for. The yoke is too long, the armholes are too deep (hello bra peeking out through the sleeve hole) and the neckline is lower as well. The resulting garment looks sloppy, ill-fitting and sadly – home made.
You can avoid this though! Here are a couple of options:
- Change yarns. The yarn might be fighting you to hit the right gauge.
- Change needle sizes. If you’re close in gauge a different size might do the trick.
- Change needle material. Slick metals tend to make the knitter knit more tightly and grabby woods can do the opposite. You’ll be shocked at the differences in gauge just by changing the material.
- And then the final option – alter the rate of increase to compensate. I’ll walk you through how to determine what to change.
Let’s start with a couple assumptions:
- Knitting direction is top-down
- Pattern row gauge 5 rows per inch
- Your row gauge 4 rows per inch
- Raglan increases every other row – meaning you work one row of increases and then a plain row. This is the most common way to work raglan increases
- Number of rows in pattern 60 rows
First, calculate the percentage you need to adjust
Take [your row gauge] / [pattern row gauge]. In our example it’s
4/5 = 0.8
This is the percentage of rows you need to reduce.
Now, calculate the number of rows that you need to knit
Take [number of rows in pattern] * [percentage of rows you need to reduce]. In our example it’s
60*.8 = 48 rows
Calculate the difference
Take [number of rows in pattern] – [number of rows you need to knit]. In our example it’s
60-48 = 12 rows
Calculate number of plain rows in pattern
Take [number of rows in pattern] / 2. In our example it’s
60 / 2 = 30 rows
So, we need to work 12 fewer plain rows over a total of 30 rows.
It’s up to you how to work in the skipping of the plain rows. I think it’s more anatomically correct to skip the plain rows closer to the armholes. So, I might try:
Row 1: raglan increase
Row 2: plain
Repeat for a total of 30 rows.
Then, begin skipping some plain rows.
Rows 1 and 2: raglan increase
Row 3: plain
Repeat for a total of 18 rows
You’ll be working a total of 48 rows instead of the 60 that the pattern called for.
A couple more things to consider
- If your raglan increases are decorative, you’ll want to keep the raglans visually consistent. This means that you’ll still work the decorative raglans every other row while working the increases as needed to do the adjustment.
- I suggest avoiding working all increase rows together without any plain rows at all. The angle will be very sharp and you might even see a bit of a pucker.
- If your pattern has waist shaping you’ll need to make a similar adjustment
- If your pattern has a neckline that gets worked at the same time as the raglans you’ll need to make a similar adjustment
I’ve tried to consider the more common issues with mis-matched row gauge but feel free to leave a comment if you have a question.
I’ll catch you on the purl side…
* I’ve been brewing a rant post on the importance of a schematic


FABULOUS!
This makes so much sense. Thank you for posting this.
you’re welcome! glad it was helpful
thanks so much, miss smarty
very helpful info and I loooooove the math so will definitely use this in the future (if I can just remember where I saw it when the time comes ~ heh)
thanks, Jody